Are you wondering how to connect your DVD player to your smart TV without any hassle? Whether you want to watch old favorites or share classic movies with family, setting up your DVD player correctly can make all the difference.
In this guide, you’ll find simple, step-by-step instructions that anyone can follow. By the end, you’ll enjoy your DVDs on the big screen with clear picture and sound—no confusion, no frustration. Keep reading to discover how easy it is to bring your DVD collection back to life on your smart TV.
Credit: columbiaisa.50webs.com
Check Your Dvd Player Ports
Checking the ports on your DVD player is the first step to connect it to a smart TV. Ports are the connectors on the back or side of the device. They determine which cables you will need for the connection. Knowing the types of ports helps avoid confusion and saves time.
DVD players usually have different port options. Some have modern HDMI ports, while others use older composite or component connections. Identifying these ports clearly guides the setup process. It ensures the best video and audio quality for your viewing experience.
Identify Hdmi Connections
HDMI ports are the most common and provide high-quality video and audio. They look like a small, flat, and wide trapezoid. The label near the port often says “HDMI.” If your DVD player has an HDMI port, use an HDMI cable to connect it to your smart TV for the best results.
Locate Composite Or Component Ports
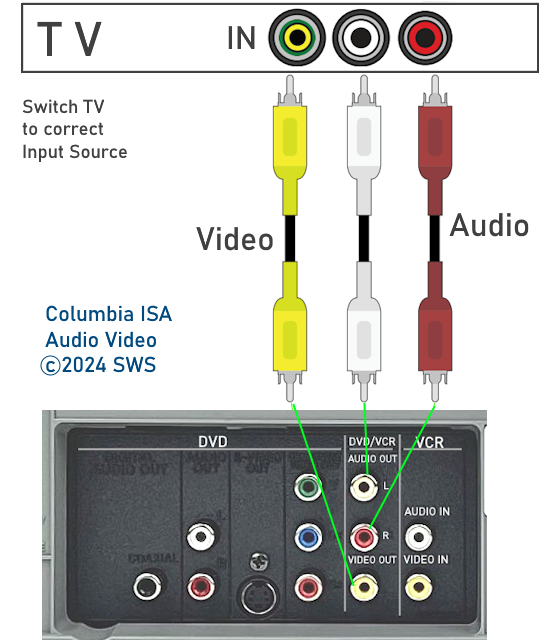
Older DVD players might have composite or component ports. Composite ports are usually a single yellow socket for video, with red and white sockets for audio. Component ports have three separate sockets for video (red, green, and blue) plus red and white for audio. These ports are round and color-coded. Use the matching cables to connect these ports to your TV.
Inspect Your Smart Tv Inputs
Before connecting your DVD player, check the inputs on your smart TV. Different TVs have different input types. Knowing which ports are available helps you choose the right cable. This step makes the connection process smoother and faster.
Find Hdmi Ports
Most modern smart TVs have one or more HDMI ports. These ports look like thin, wide slots labeled “HDMI.” HDMI offers the best audio and video quality. If your DVD player has an HDMI output, use this port for the connection. Check the side or back of your TV for these ports.
Locate Av Or Component Inputs
Older DVD players may use AV or component cables. AV inputs have three round ports: yellow, red, and white. Yellow carries video; red and white carry audio. Component inputs have five ports, usually colored red, green, blue, and two audio ports. These ports are often on the back of the TV. Identify these inputs if your DVD player lacks HDMI output.
Choose The Right Cable
Choose a cable that matches both your DVD player and smart TV ports. HDMI cables offer the best quality and easy connection. For older devices, use component or composite cables for reliable audio and video.
Connecting a DVD player to your smart TV can seem like a daunting task with so many cable options available. The secret to a smooth connection lies in choosing the right cable that suits both your devices. Selecting the correct cable not only ensures you get the best picture and sound quality but also simplifies the setup process. Let’s dive into the best options to make your movie nights seamless and enjoyable.
Use Hdmi For Best Quality
If both your smart TV and DVD player have HDMI ports, this is the ideal choice. HDMI cables transmit both audio and video signals in high definition, offering a crystal-clear picture and immersive sound. Connecting with an HDMI cable is straightforward—simply plug one end into the DVD player and the other into your TV. Your devices should automatically recognize each other. In my experience, using HDMI cables has always resulted in the best viewing experience. You’ll notice richer colors and sharper images. Plus, it reduces the clutter of multiple cables.
Alternative: Composite Or Component Cables
What if your devices don’t support HDMI? You still have options. Composite cables, often recognized by their red, white, and yellow connectors, can be used. They’re an older technology but still effective for standard definition playback. Plug the yellow connector into the video input and the red and white connectors into the audio inputs on your TV and DVD player. Component cables offer a step up from composite, with separate cables for video and audio, allowing for better picture quality. They use red, blue, and green connectors for video and additional red and white for audio. These alternatives are great if you’re dealing with older equipment. However, bear in mind that the picture quality won’t match HDMI. But isn’t it great to know that vintage DVDs can still be enjoyed with the right setup? When setting up, it’s crucial to check your TV’s input settings to ensure it matches your cable choice. This simple check can save you from frustration and confusion. Selecting the right cable is all about understanding your equipment and maximizing the quality of your entertainment experience. What cables do you have lying around, and how can they enhance your viewing today?
Connect The Dvd Player To Tv
Connecting your DVD player to your smart TV is simpler than it seems. Getting the right cables and plugging them correctly will bring your movies and shows to life on the big screen. Let’s look at the ways to connect your devices so you can enjoy your favorite DVDs without hassle.
Plugging In Hdmi Cable
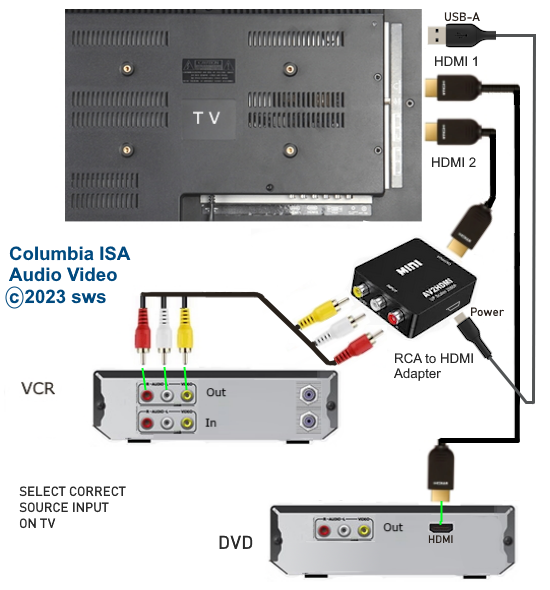
The easiest and best way to connect a DVD player to your smart TV is through an HDMI cable. HDMI carries both video and audio signals in one cable, reducing clutter and improving quality.
Locate the HDMI port on the back of your DVD player and plug one end of the cable in. Then, find the HDMI input on your TV and connect the other end there. Switch your TV input to the corresponding HDMI channel, and your DVD player screen should appear instantly.
Have you noticed how much clearer the picture is with HDMI compared to older cables? If your DVD player and TV both support HDMI, this is the connection you want.
Using Composite Or Component Cables
If your DVD player or TV doesn’t have an HDMI port, composite or component cables are your next option. These cables use multiple connectors, usually color-coded, to transmit audio and video separately.
Composite cables have three plugs: yellow for video, and red and white for audio. Component cables have five plugs: three for video (red, green, blue) and two for audio (red and white). Make sure to match each cable to the correct port on both your DVD player and TV.
After plugging in, switch your TV to the right input source. The picture quality won’t be as sharp as HDMI, but it still delivers a reliable connection. Have you ever tried swapping cables to see if the picture gets better? It’s a simple trick that can make a difference.
Set The Tv Input Source
Setting the TV input source is a key step to view content from your DVD player on a smart TV. The TV needs to know where to get the video and audio signals. This step ensures the TV displays the DVD player’s output correctly. Without selecting the right source, the screen may stay blank or show the wrong content.
Understanding how to access and change the input source makes the connection process smoother. It helps avoid confusion and quickens setup time. Follow these simple actions to set your TV input source properly.
Accessing Input Or Source Menu
Most smart TVs have a button labeled “Input” or “Source” on the remote control. Press this button to open the input menu. Some TVs use the “Menu” button first, then you select “Input” or “Source” from the options. The menu usually appears as a list or grid of available inputs.
Use the arrow keys on your remote to navigate through the list. The names might include HDMI 1, HDMI 2, AV, Component, or TV. Look for a name matching the connection type used by your DVD player.
Selecting The Correct Hdmi Or Av Input
Identify the cable type connecting your DVD player to the TV. If you use an HDMI cable, select the HDMI input that matches the port. For example, if the cable plugs into HDMI 1 on the TV, choose HDMI 1 from the input menu.
If you use AV cables (red, white, and yellow), choose the AV input. Sometimes this is called Composite or Video. Ensure the colors on the cable match the TV ports for correct connection.
After selecting the correct input, press the “OK” or “Enter” button on the remote. The TV screen should now display the DVD player’s interface. You can start playing your DVD and enjoy the content on your smart TV.
Credit: columbiaisa.50webs.com
Test The Connection
Testing the connection between your DVD player and Smart TV ensures everything works correctly. This step confirms the setup is complete and ready for use. Follow simple checks to verify the connection is active and the devices communicate well.
Power On Devices
Turn on the TV and DVD player. Use the TV remote to select the correct input source. This input matches the port where you connected the DVD player. Wait a few seconds for the devices to sync. If the screen stays blank, double-check the cable connection and input setting.
Play Dvd To Confirm
Insert a DVD into the player. Press the play button on the DVD remote. Watch the TV screen for video and sound. Clear picture and audio mean the connection works fine. No picture or sound signals a problem. Try adjusting cables or changing inputs again.
Troubleshooting Common Issues
Connecting your DVD player to a smart TV should be straightforward, but sometimes things don’t work as expected. Troubleshooting common issues can save you time and frustration. Let’s look at some typical problems you might face and how to fix them quickly.
No Signal On Tv
If your TV shows “No Signal” after connecting the DVD player, first check the cable connections. Make sure the HDMI or AV cables are firmly plugged into the correct ports on both devices.
Switch your TV input source to the one matching the DVD player’s connection. Sometimes, the input setting is the culprit, not the cables.
If that doesn’t work, try a different cable or port. Faulty cables or damaged ports can cause this issue. Have you tested the DVD player on another TV to see if it’s the source of the problem?
Poor Video Or Audio Quality
Are you seeing blurry video or hearing distorted sound? The issue could be the type or quality of the cables you’re using. Low-quality or damaged HDMI or AV cables often degrade signal quality.
Try replacing your cables with higher-quality ones or use HDMI instead of older composite cables for better results.
Another common cause is incorrect settings on your DVD player or TV. Check the resolution settings on your DVD player and ensure your TV supports that resolution.
Dvd Player Not Recognized
If your smart TV fails to detect the DVD player, there might be a software or compatibility issue. Restart both devices and try reconnecting. Sometimes, a simple reboot fixes recognition problems.
Check if your TV firmware and DVD player software are up to date. Outdated software can cause communication issues between devices.
Consider resetting your TV’s input settings or performing a factory reset on the DVD player if nothing else works. What steps have you taken to ensure your devices are compatible?

Credit: columbiaisa.50webs.com
Frequently Asked Questions
How Do I Connect A Dvd Player To A Smart Tv?
Use an HDMI cable to connect the DVD player’s HDMI out to the TV’s HDMI in. Select the correct HDMI input on your TV to start playback.
Can I Use Rca Cables To Connect Dvd To Smart Tv?
Yes, if your DVD player and TV have RCA ports, connect the red, white, and yellow cables accordingly. Then select the AV input on your TV.
Why Is My Dvd Player Not Showing On Smart Tv?
Check all cable connections and ensure the TV is set to the correct input source. Also, verify the DVD player is powered on and functioning.
Do I Need An Adapter To Connect Dvd To Smart Tv?
If your TV lacks compatible ports, use an HDMI to RCA or VGA adapter. This helps connect older DVD players to modern smart TVs.
Conclusion
Connecting a DVD player to a smart TV is easy and quick. Use the right cables and ports for the best picture. Adjust the TV input to see your DVD content clearly. This simple setup lets you enjoy movies on a bigger screen.
Try different connection options to find what works best. Now, you can watch your favorite DVDs with ease. No extra tools or skills needed. Just follow these steps and start enjoying your shows today.


