Are you tired of that old nightstand sitting in the corner of your bedroom, looking worn out and outdated? Imagine transforming it into a stunning piece of furniture that catches everyone’s eye.
Refinishing a nightstand is easier than you might think, and it can bring new life to your space without breaking the bank. In this guide, you’ll discover simple, step-by-step techniques to restore your nightstand to its former glory or give it a completely new look.
Whether you’re a seasoned DIY enthusiast or just looking for a fun weekend project, this article will show you how to achieve professional results with minimal effort. Get ready to unleash your creativity and turn your nightstand into the statement piece your room deserves. Read on to find out how!

Credit: 100things2do.ca
Choosing The Right Nightstand
Choosing the right nightstand to refinish is a crucial first step in transforming your bedroom’s aesthetics. The nightstand you select will serve as your canvas, determining the final look and feel of your project. Before diving into the refinishing process, take a moment to consider the condition and style of your chosen piece to ensure it aligns with your vision.
Assessing Condition
Start by examining the overall condition of the nightstand. Look for signs of damage like deep scratches, dents, or water marks. These issues might require additional repair work before refinishing.
Consider the material and construction. Is it made of solid wood, veneer, or particle board? Solid wood pieces are typically more durable and easier to refinish.
Don’t overlook the hardware. Check if the knobs and handles are in good shape or if they need replacement. Sometimes, simply changing the hardware can make a dramatic difference.
Selecting Style And Design
Think about the style you want your nightstand to reflect. Do you prefer a modern, sleek look or something more vintage and ornate? Your choice should complement the existing decor in your room.
Consider the color and finish. A bold color can make your nightstand a focal point, while a neutral tone might blend seamlessly with other furniture. What statement do you want your nightstand to make?
Reflect on your personal taste and the functionality you need. Do you require extra storage, or is a minimalist design more appealing? Your nightstand should be both practical and pleasing to your eye.
Have you ever refinished a piece of furniture and instantly regretted the style choice? Reflecting on past experiences can guide your current decision. Take your time and choose wisely!

Credit: www.rustoleum.com
Gathering Essential Tools
Gather essential tools like sandpaper, a paintbrush, and a drop cloth to begin refinishing your nightstand. Having these items ready simplifies the process and helps achieve a smooth, updated look.
Refinishing a nightstand can breathe new life into your bedroom furniture, giving it a fresh, stylish look. Before you dive into this rewarding project, it’s essential to gather the right tools to ensure a smooth and successful process. Having all the necessary supplies and safety gear on hand can save you time and frustration, allowing you to focus on the creative aspects of refinishing.
Basic Supplies
When tackling a refinishing project, having the right basic supplies can make all the difference. Start with sandpaper in various grits; it’s crucial for stripping the old finish and smoothing the surface. You might want to consider a sanding block or an electric sander to make the job easier and more efficient. Next, choose a good quality wood stain or paint depending on your desired finish. Brushes or foam applicators are essential for applying the stain or paint smoothly. Don’t forget a drop cloth or old sheet to protect your flooring from spills and drips. Finally, a clean cloth or tack cloth is a must-have for wiping down dust and debris before applying any new finish. This ensures a flawless and professional look. Have you thought about the color or finish you want for your nightstand yet?
Safety Gear
Safety should always be a priority when working with tools and chemicals. Start with a pair of safety goggles to protect your eyes from dust and splinters. A dust mask or respirator is vital to shield your lungs from harmful fumes and dust particles, especially when sanding or applying finishes. Consider wearing gloves to protect your hands from stains, paint, or chemicals that might irritate your skin. It’s also wise to wear old clothes or an apron that you don’t mind getting stained. Finally, ensure your workspace is well-ventilated. Open windows or use fans to keep the air circulating, minimizing your exposure to fumes. Are you ready to transform your nightstand while keeping safety in mind?
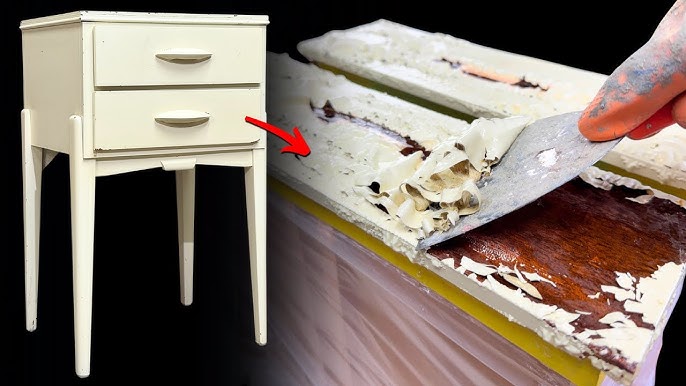
Preparing The Surface
Preparing the Surface Clean the nightstand thoroughly to remove dust and grime. Sand the entire surface using fine-grit sandpaper to ensure a smooth finish. Wipe away any sanding residue with a damp cloth before moving to the next step.
Refinishing a nightstand can breathe new life into your furniture. The first step is preparing the surface. This step is crucial for a smooth, lasting finish. A well-prepared surface ensures the paint or stain adheres properly. You will achieve a professional look without flaws. Let’s explore how to prepare your nightstand’s surface effectively.
Cleaning Techniques
Start by cleaning the nightstand thoroughly. Remove any dust, dirt, or grease. Use a mild soap and water solution. Avoid soaking the wood. A damp cloth works well. Dry the surface with a clean towel. For stubborn stains, use a gentle wood cleaner. Ensure the surface is completely dry before moving on.
Sanding Basics
Sanding removes the old finish and smooths the wood. Use medium-grit sandpaper first. Sand the entire surface evenly. Follow the wood grain for best results. After the initial sanding, switch to fine-grit sandpaper. This helps achieve a smooth finish. Wipe away dust with a tack cloth. Ensure no residue remains. A clean, sanded surface is ready for the next steps.
Applying Primer
Applying primer ensures a smooth finish on your nightstand. It helps the paint stick better and last longer. Use a brush or roller for even coverage.
Applying primer is a crucial step in refinishing a nightstand. It prepares the surface for paint, ensuring a smooth finish. Primer also helps the paint adhere better, prolonging the life of your work. Without primer, your paint job may not last long.
Choosing The Right Primer
Select a primer suitable for your nightstand’s material. Wood requires a different primer than metal or laminate. Oil-based primers work well on wood. They block stains and odors. For metal, use a rust-inhibiting primer. It prevents rust from forming. Laminate surfaces need a special bonding primer. It ensures the paint sticks well. Always read the label for specific use instructions.
Proper Application Techniques
Start by cleaning the nightstand thoroughly. Remove dust and grease. Use a tack cloth for final cleaning. Apply primer with a quality brush or roller. A brush works for detailed areas. Rollers cover larger surfaces quickly. Apply thin, even coats to avoid drips. Let each coat dry completely. Check the primer’s drying time on the label. Sand lightly between coats for a smooth finish. Use fine-grit sandpaper for this step. Wipe away dust after sanding. Repeat until the surface is ready for paint.
Painting Your Nightstand
Painting your nightstand can transform its look entirely. It’s an exciting way to refresh your room without spending much. Plus, it’s a fun and creative project. Let’s dive into the process of painting your nightstand to give it a new life.
Selecting Paint Colors
Choosing the right paint color is crucial. It sets the mood of your room. Consider colors that complement your existing decor. Soft pastels create a calming effect. Bold colors make a statement. You can use a single color for a classic look. Or try two-tone shades for something unique. Always test colors on a small area first. This ensures you’re happy with your choice.
Achieving Smooth Finishes
Smooth finishes make your nightstand look professional. Start by sanding the surface. This helps the paint stick better. Use a fine-grit sandpaper for best results. Clean the dust with a damp cloth before painting. Apply a primer to ensure even paint coverage. It also helps hide any imperfections. Use a good quality brush or roller for painting. Apply thin, even coats and let each dry fully. Lightly sand between coats for a flawless finish. Seal with a clear topcoat for durability.
Adding Protective Coating
Adding a protective coating is a crucial step in refinishing your nightstand. This layer not only enhances the beauty of the wood but also shields it from scratches, water damage, and everyday wear and tear. But how do you choose the right sealant and apply it effectively?
Types Of Sealants
There are several types of sealants available, each offering different levels of protection and finish. Polyurethane is a popular choice due to its durability and resistance to moisture. It’s perfect for nightstands that might endure spills or other mishaps. If you prefer a natural look, consider using a tung oil or linseed oil, which penetrate the wood and give it a warm glow. Varnishes can also be a great option, providing a hard, glossy finish that can withstand daily use.
Choosing the right sealant depends on your lifestyle and aesthetic preferences. If you have children or pets, a tougher finish like polyurethane might be ideal. Meanwhile, oil-based sealants can be a fantastic choice for a more rustic or vintage look.
Application Tips
Applying sealant correctly is essential to achieving a smooth, even finish. Start by ensuring your nightstand is clean and dust-free. Use a soft brush or cloth to apply the sealant in thin layers. This helps avoid drips and uneven spots. Allow each layer to dry completely before adding another.
Remember, patience is key. Rushing through the process might lead to a less-than-perfect finish. Consider sanding lightly between coats to create a smooth surface and enhance adhesion. How many layers should you apply? Generally, two to three layers provide sufficient protection, but you can add more if you desire extra durability.
Have you ever tried applying sealant on a windy day? It’s not recommended! Wind can blow dust onto your wet surface, ruining your hard work. Always choose a calm day or move indoors to avoid this common pitfall.
Incorporating Decorative Elements
Add decorative elements like stencils or decals to a nightstand for a unique touch. Choose colors and patterns that complement your room.
Incorporating decorative elements can transform a simple nightstand into a stunning piece. You can breathe new life into your furniture by adding unique touches. This section explores how to enhance your nightstand with creative upgrades.
Hardware Upgrades
Changing the hardware can significantly alter the look of a nightstand. Opt for knobs or handles that complement the room’s theme. Brass, chrome, or ceramic are popular choices. They come in various shapes and sizes. Consider sleek, modern styles for a contemporary feel. Vintage or ornate designs suit traditional aesthetics. Ensure the new hardware fits the existing holes. This saves time and effort during installation.
Creative Accents
Add character with creative accents. Decals, stencils, or paint can create a personalized touch. Geometric shapes, floral patterns, or abstract designs add visual interest. Consider using contrasting colors for a bold statement. Fabric overlays can add texture and warmth. Choose a pattern that matches your decor. For a rustic look, try distressing techniques. Light sanding or chalk paint can achieve this effect. These accents can make your nightstand stand out.
Final Touches
Sanding the nightstand ensures a smooth surface for painting. Apply primer to enhance paint adhesion. After drying, paint with your chosen color for a fresh look. Consider adding a protective finish for durability.
As you near the end of your nightstand refinishing journey, the final touches are where the magic happens. This stage is crucial in bringing out the best in your project and ensuring a polished, professional look. Whether you’re a first-time DIYer or a seasoned pro, focusing on these details will make all the difference.
Inspecting For Flaws
Before you declare your project complete, take a moment to inspect your work. Look closely for any drips, bubbles, or uneven finishes. A bright light or natural sunlight can help reveal hidden imperfections. Use your fingers to feel for any rough spots. They should be smooth to the touch. Address any issues immediately. A little extra sanding or a touch-up coat can save you from future regret.
Polishing Techniques
Polishing is where your nightstand truly shines. Choose a quality wax or polish that suits the finish you’ve applied. Apply the polish using a soft, clean cloth, working in circular motions. This not only enhances the sheen but also protects the wood. Consider using a buffing pad for an extra glossy finish. It might take a bit more elbow grease, but the results are worth it. Have you ever noticed how a well-polished piece catches the eye? This final step will ensure your nightstand stands out, reflecting your hard work and attention to detail. Finish up by stepping back and admiring your handiwork. Is there anything more satisfying than seeing a project through to completion?

Credit: www.youtube.com
Frequently Asked Questions
Do I Need To Sand The Nightstand Before Painting?
Yes, sanding the nightstand is essential before painting. It creates a smooth surface and ensures better paint adhesion. Removing old finish and imperfections enhances the final look. Use fine-grit sandpaper for best results. Proper preparation leads to a professional finish and extends the paint’s durability.
How To Refurbish A Bedside Table?
Start by sanding the bedside table to remove old paint or varnish. Apply a primer for better adhesion. Paint or stain the surface with your chosen color. Let it dry completely. Add new hardware or decorative elements for a refreshed look.
Enjoy your newly refurbished bedside table!
What Kind Of Paint Is Best For A Nightstand?
Choose latex or acrylic paint for your nightstand. Both options dry quickly and offer durability. Latex is water-based, easy to clean, and low-odor. Acrylic paint provides a smooth finish and is versatile for various surfaces. Ensure you prime the nightstand for better adhesion and longevity.
How Much Does It Cost To Refinish A Nightstand?
Refinishing a nightstand typically costs between $50 to $150. Prices vary based on materials and labor. DIY refinishing can save money but requires time and effort. Hiring a professional may offer better results but at a higher cost. Always compare quotes for the best deal.
Conclusion
Refinishing a nightstand is simple and satisfying. First, gather your tools. Then, remove old paint or stain. Sand the surface until smooth. Apply primer for a strong base. Choose a paint color you love. Paint evenly for a polished look.
Let it dry completely. Finish with a sealant to protect your work. Enjoy your refreshed piece! You created a unique nightstand. Your space now feels more personal. Celebrate your DIY success! Keep trying new projects. Each one improves your skills.
Have fun with creativity and style!


